Have completed your first self-hosted WordPress installation? Well, now let's learn things that need to be done just after installing a WordPress blog. From this guide, you will learn to clean up your WordPress site from stock dummy contents, configure for WordPress SEO, avoid SPAM and better security measures you can take.
Step 1: Remove the pre-installed dummy contents from WordPress
By default when you install WordPress by the one-click method from your web hosting company or by manually installing WordPress, you get some dummy content preloaded on your new WordPress site. This includes the 'Hello World' post, 'Sample Page', 'Uncategorized' category and default comment. This is here for you to get a quick understanding of the WordPress platform. But, when you are ready to blog you won't need those dummy contents.
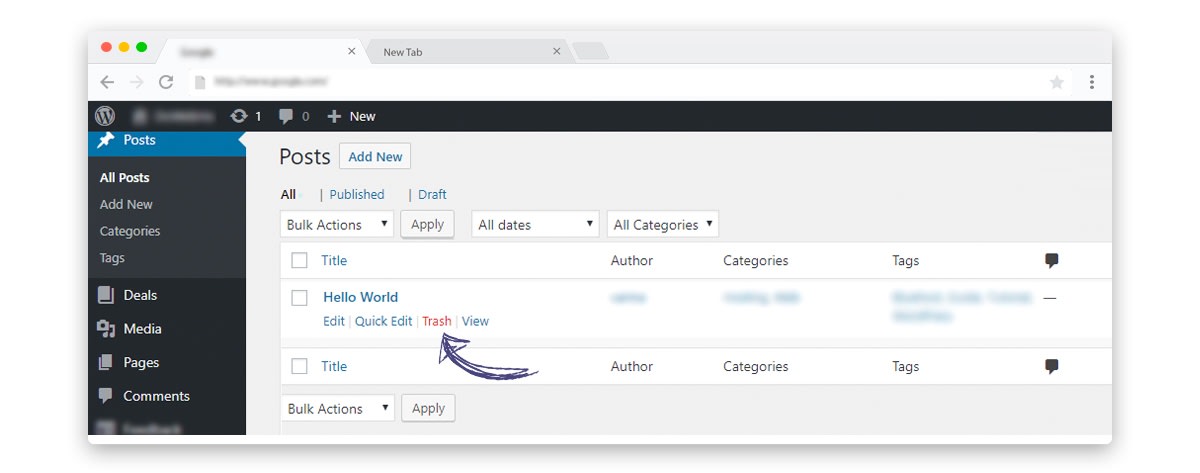
- To remove the 'Hello World' post, head over to your WordPress dashboard and go to Posts > All Posts. There you will find the 'Hello World' post which you can trash it and will be removed within 30 days. (or you can go to the trash tab and delete the post permanently now and then).
- In the same way, you can go to Pages > All Pages and trash the 'Sample Page'.
- To remove the default comment, head over to the 'Comments' tab and delete it.
- Also, rename the default 'Uncategorized' in Post > Categories, to your blog related category. Like, if you are starting a tech blog, you can rename the default uncategorized category to something to your posts is based on - 'Gadgets', 'Mobile' etc.
Step 2: Enable/Disable WordPress member registration
The next thing you need to decide is to have users registering on your WordPress site. By default, WordPress disables user registration and it's best to be like that. Opening up the user registration feature will bring in lots of spam registration and you may need to implement additional security measures to resolve it.
If you are going to start a multi-author blog, where you and your friends/co-workers are going to also post on your blog then you need to enable the WordPress user registration.
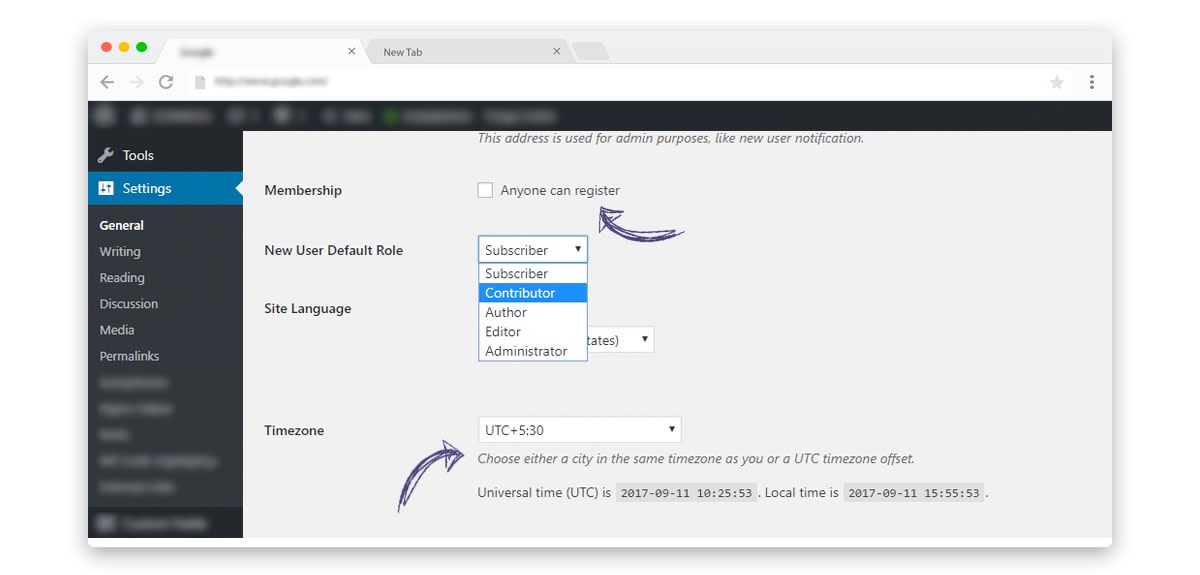
- To enable user registration on WordPress, go to Settings > General and tick the 'Anyone can register' option. You may also need to set the 'New User Default Role' to the contributor for multi-author blogs.
Step 3: Setup WordPress Timezone
Under the Settings > General section, you can set the default WordPress timezone to one of your local time. This helps you to correctly schedule the posts based on your time zone. Here you can find the list of UTC time offsets for your country.
Step 4: Adjust the WordPress Permalink Settings
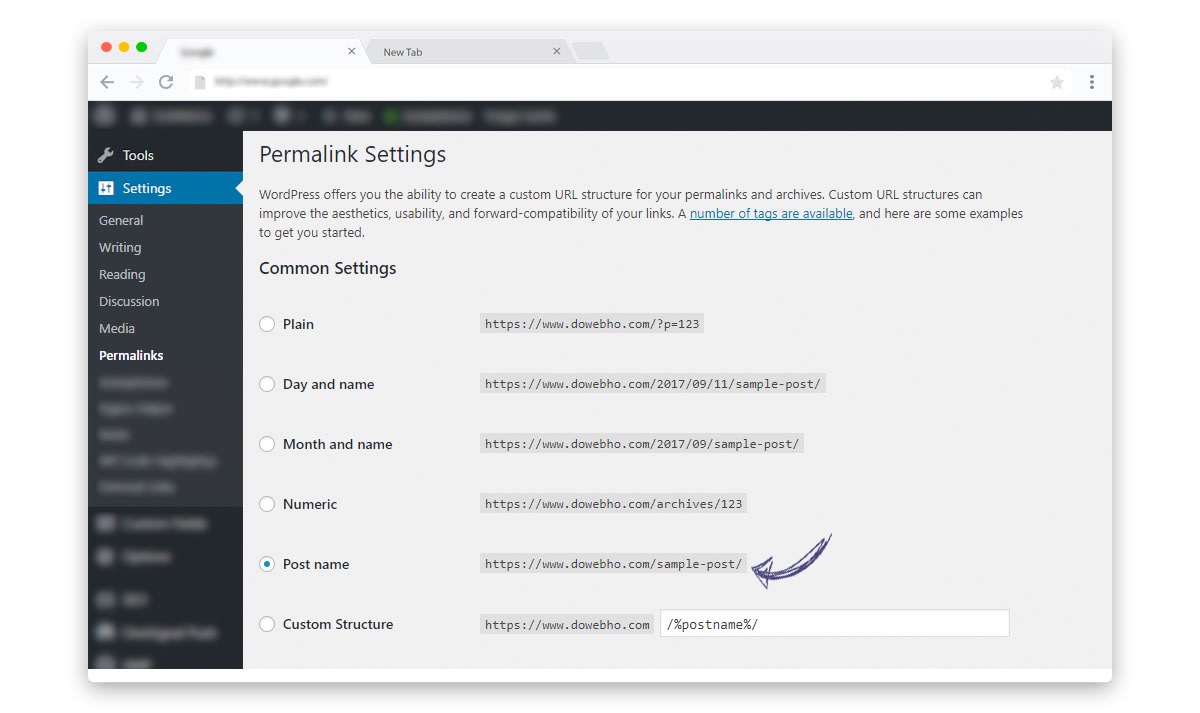
WordPress Permalink settings play a big part in your websites search engine optimisation (SEO) activity. By default, WordPress put the permalink structure to something like 'https://yourdomain.com/?p=123', which is pretty bad for SEO. You need to change the WordPress default permalink to something meaningful and SEO friendly.
- For changing the WordPress Permalink, head over to Settings > Permalink and choose the 'Post name' option. This will take your Posts/Pages title for the permalink. For example - https://yourdomain.com/my-first-seo-article.
Step 5: Setup WordPress comments
By default, WordPress sets the best setting for WordPress comments. But, you can strengthen it to avoid spam comments.
- For that, head over to Settings > Discussion and there under the 'Before a comment appears' section tick the 'Comment must be manually approved' option. This will make sure all comments are manually approved by you before getting published on your post.
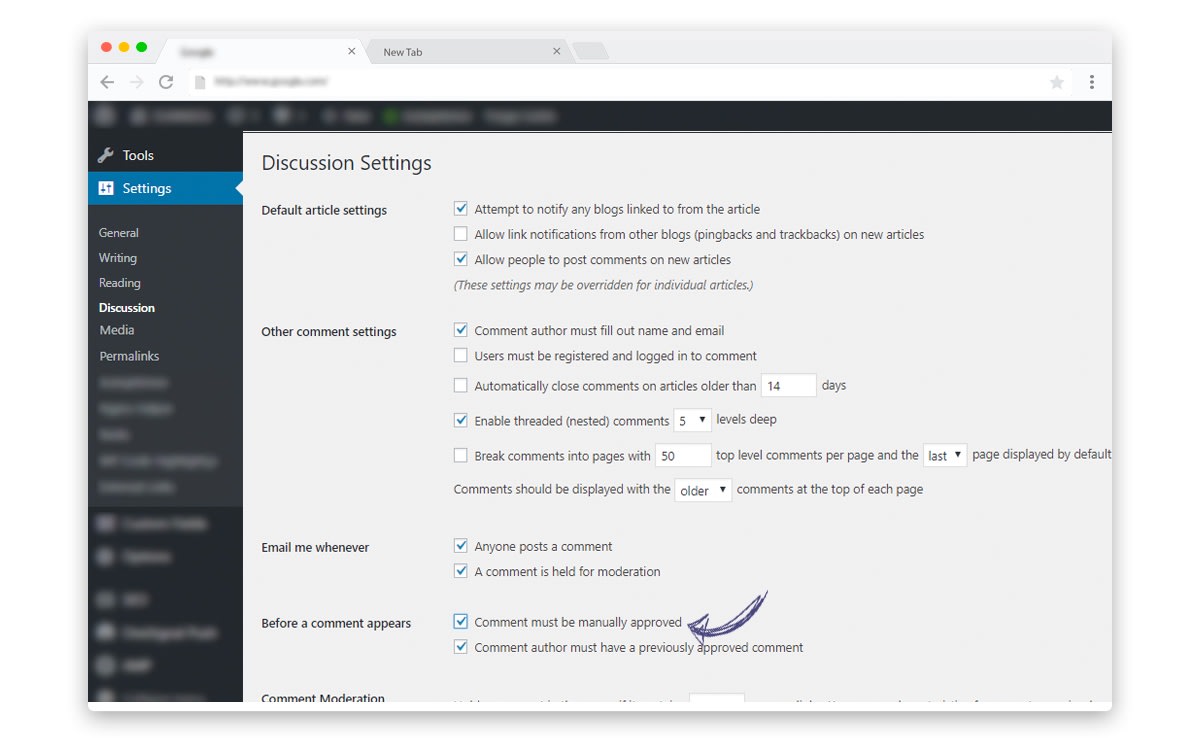
You also want to enable the option to break comments into pages of 25-50 comments per page. This will help you to organise and display comments in a blog post most effectively. You can keep the rest of the comment settings on that page as it is.
Step 6: Remove image sizes from WordPress
Whenever you upload an image to your post or pages, WordPress by default creates multiple copies of the image in different sizes/dimension. This will overcrowd your upload folder taking up lots of your hosting storage space.
Well, in most case creating multiple image sizes of a single image is not needed. With responsive designs and more appropriate image handling by modern browsers, you can safely avoid this.
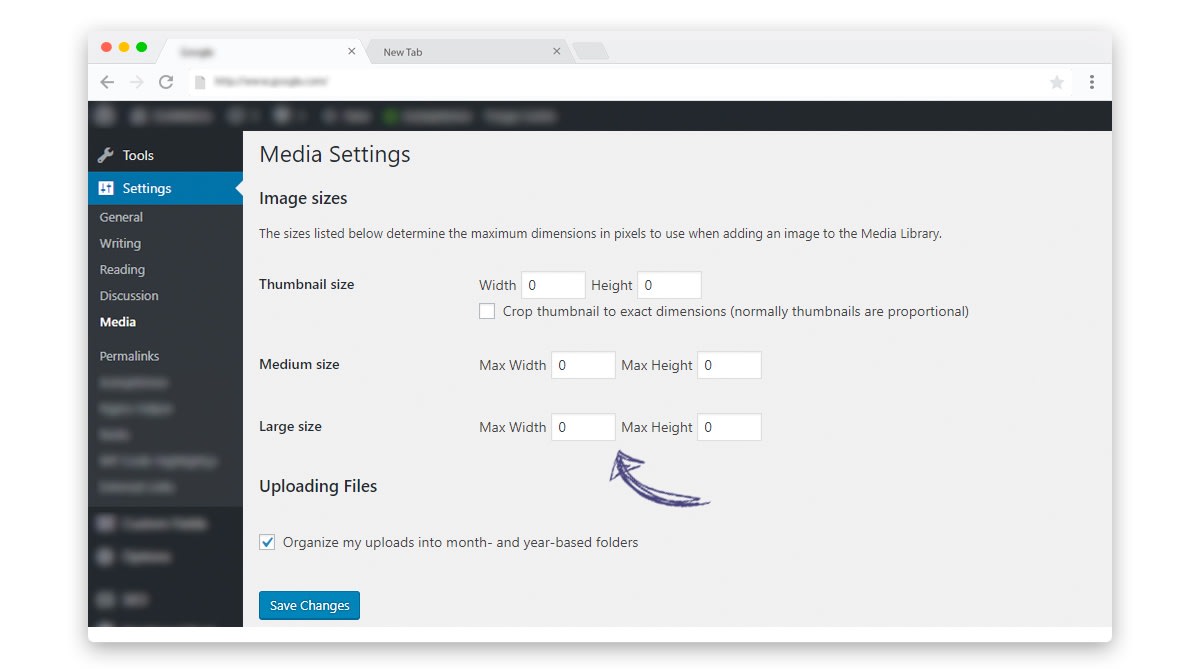
- In the Settings > Media, choose '0' on both width and height for thumbnail size, medium size and large size. This will essentially disable WordPress from generating different size images.
For further speeding up the image loading and making it responsive for mobile devices you can enable the Photon image CDN feature in Jetpack WordPress plugin. I would also suggest to always compress the image before uploading to WordPress. You can use online free image compressing tools like TinyJPG, Kraken etc.
Step 7: Update your WordPress Ping list
Want to let the search engines know about your newest article posted on your WordPress blog? Ping them about the new articles using WordPress ping service. By default, WordPress only pings to one service 'pingomatic'. But, you can add a dozen more ping services, to automatically notify them about your new posts.
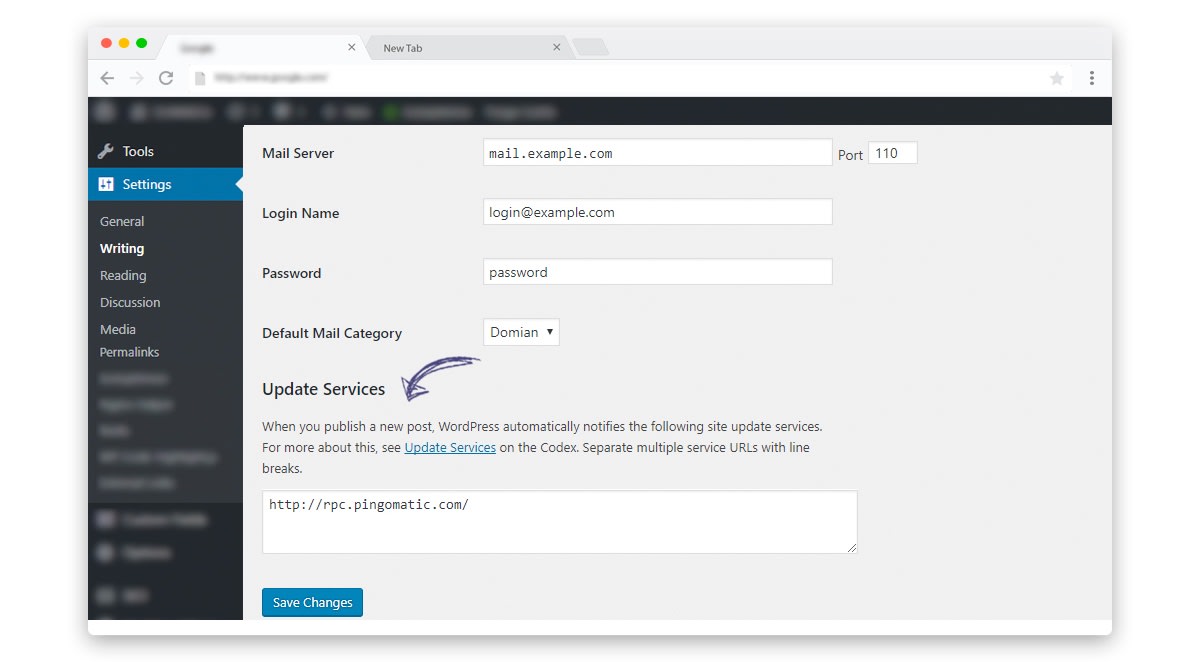
- To add more Ping services to your WordPress blog, head over to Settings > Writing. Under the 'Update Services' add your list of WordPress ping services. Here is a list of active WordPress ping services along with their status.
Step 8: Google Webmaster and Google Analytics
Another important thing to do after installing your WordPress blog is to add them to Google Webmaster and Google Analytics. Google Webmaster help's you to track your site's search performance. Whereas, Google Analytics helps you to know your site traffic, user behaviour, site performance and more.
Step 9: Start installing Essential WordPress plugins
For a WordPress blog that's just getting started, we only need to have a very few handfuls of WordPress plugins. Most of them are free WordPress plugins and a couple of them come with paid plans for further enhancing its features.
- Akismet - it's one of the must-have WordPress plugin, which also comes pre-installed with every WordPress site. It's an advanced hosted anti-spam service for your WordPress site developed and maintained by Automattic. You can enable the plugin and get an API key by registering your site with Akismet.
- Jetpack - It's also a free WordPress plugin from Automattic and adds a bunch or more correctly a large pool of functionality to your WordPress site. Jetpack adds an extra layer of security, richer contents, image CDN, traffic monitoring and more to your WordPress website. Most of the services offered by Jetpack are free, but you can get enhanced feature like automated daily backup, priority support etc by subscribing to Jetpack paid plans.
- Yoast SEO - For better search engine optimisation of your WordPress blog and articles, you definitely need this plugin. It also adds a sitemap, schema, social meta tags and more.
- Autoptimize - a super simple plugin to optimize, cache and speed up your WordPress site. It can aggregate, minify and cache scripts and styles, minifies HTML, injects CSS in the page head by default and can move and defer scripts to the footer.
- Contact Form 7 - want an efficient contact form on your website, then you need the Contact Form 7 WordPress plugin.
That's it, if you had followed this guide then you have covered the basics to be done after every WordPress installation. This small guide will help you to have a proper first-level configuration for your WordPress blog. It will help you to properly configure your WordPress site for SEO, security, cleanness and user engagement.
If you have any doubts in configuring WordPress, let me know in the comment section below.