Zoho Mail has updated their feature list recently, now for users in 'Free plan' signed up newly, the Email Forwarding feature will not be available. Those of you who have signed for the service earlier and activated the Email Forwarding feature, would still able to use it without any sort of restriction.
After Google stopped new signups to Google Apps Free edition (legacy), startups and bloggers like us were doomed. We were forced to bear the expense of having a business email. Or set up one free business email accounts with our hosting company or third party providers, it's quality and convenience defer way from Gmail.
I know lots of my blogger friends asking the same question again and again:
How to get a free Google Apps (now G Suite) account and create a business Gmail/email address with a domain?
Here is a quick guide, to set up a free and secure business email account, integrate that with your most loved Gmail account and send/receive your business emails directly from Gmail.

In this how-to guide, we will be covering -
- Set up a free business email (with your domain name) in Zoho Mail.
- Automatically forward all your incoming emails in Zoho Mail to Gmail (personal or G suite).
- Configure Gmail to send emails with your newly created business email address on Zoho Mail.
Step 1 - Set up free business email with Zoho Mail
Zoho Mail is one of the best free alternatives to G Suite/Google Apps. Using it you can create and maintain a business email address with your domain name (like hello@yourdomain.com). It's secure, no ads whatsoever, easy to manage and more importantly easy to set up. On the free tier, you can create 25 users with each user getting 5GB storage space and 20MB attachment limit. So, here's how to set up your business email address with Zoho Mail.
- Sign up with Zoho Mails using your domain name.
- Zoho has a great step-by-step guide on what you need to do and how you need to do. Running that down quickly
- First, you need to verify the ownership of your domain name. For that, you can either add a new CNAME or TXT record under your domain DNS. (Your domain's DNS management will be usually maintained by a domain registrar like NameCheap or Name.com)
- Once the domain is verified, you need to update the MX records for your domain.
- Additionally, you may also configure SPF (Sender Policy Framework) and DKIM (DomainKeys Identified Mail), so that your emails get delivered correctly on users inbox and not end up in the spam or junk mails.
Most of these steps would be easy to achieve. If in any case, you get stuck setting up the account, Zoho has an entire FAQ section dedicated to email hosting setup.
Step 2 - Forwarding emails from Zoho Mail to Gmail
Once you have your company/domain email setup with Zoho Mail, the next step is to forward all emails coming to your company email ID in Zoho Mail to your Gmail account. This allows you to read all your emails from Zoho Mail directly on Google's Gmail. The best part you can utilize Gmail's priority inbox and other tools to sort and filter these emails.
- Log in to Zoho Mail account using the newly created business email account.
- Select the Zoho Mail settings (gear icon in the top right corner) and choose the "Email forwarding and POP/IMAP" option.
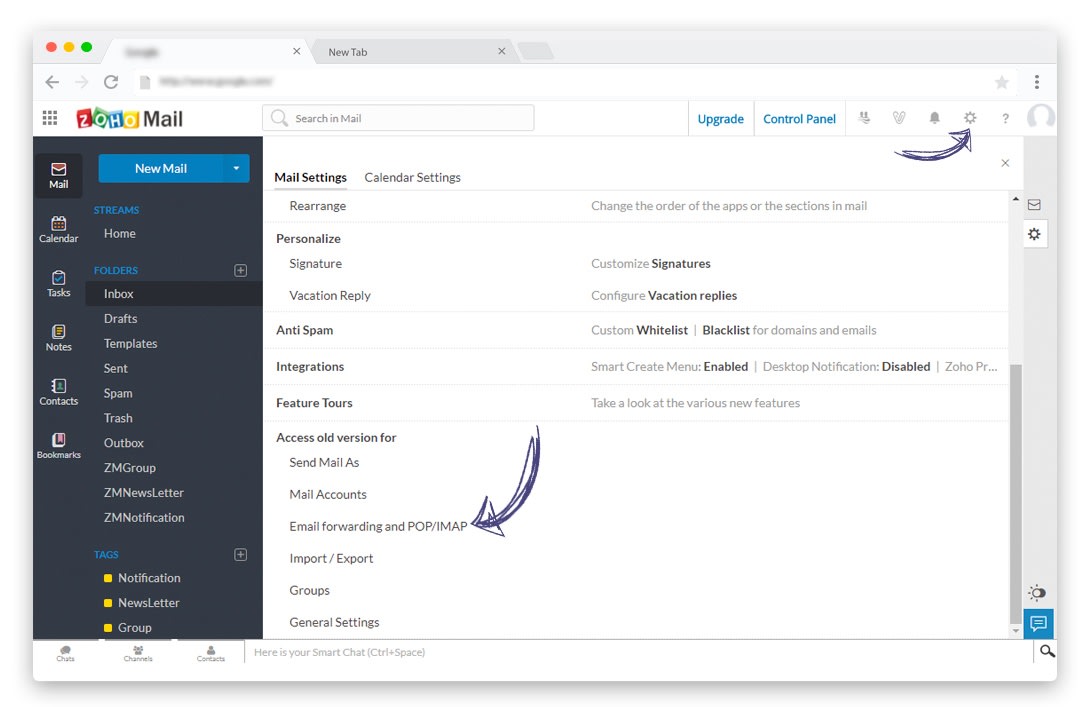
- This will open up a new window in your browser. There, under the "Forward a copy of incoming message to:" option, add your Gmail address to where you want a copy of all emails to be forwarded from Zoho Mails.
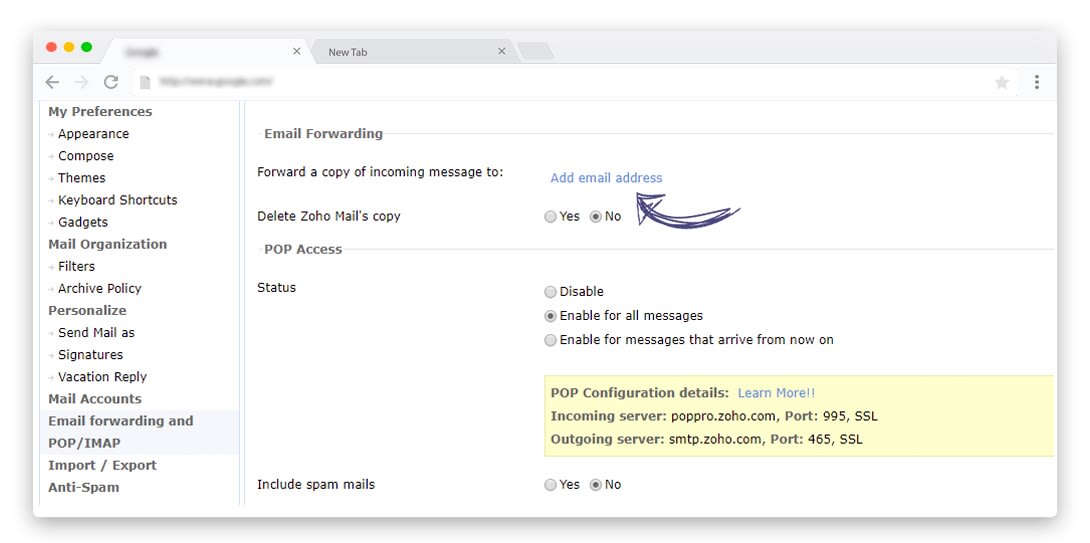
- Zoho Mail now sends a verification email (with verification code) to your added Gmail address. You will need to enter that verification code in the Zoho settings to fully activate the email forwarding option.
That's it, from now on all emails coming to your domains/company Zoho Mail will be automatically forwarded to your Gmail address.
To quickly check if you have done it correctly, send a new email to the company/domain email address. It should and will show up in your Gmail inbox.
Step 3 - Configure Gmail to send emails from your Business email address
So, you have your free business email address setup with Zoho Mail. Configured it to forward every email coming there to your Gmail address. Now, the last part is where you will configure your Gmail to send emails pertaining to coming from your business email account instead of your personal Gmail address. This allows you to reply to emails or send new emails from your business email address directly from Gmail.
- In your Gmail account, select "Setting" and from there go to "Accounts and Import" tab.
- There, under "Send mail as:" section choose to "Add another email address".
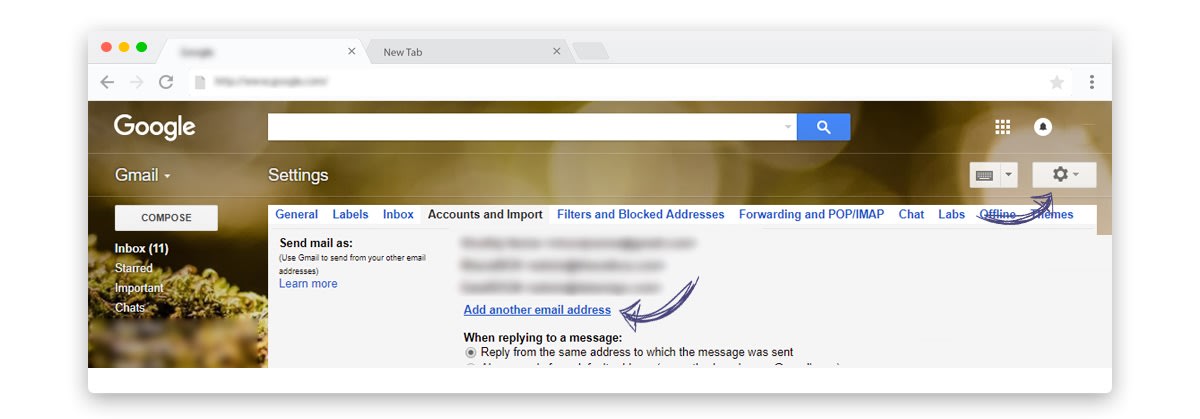
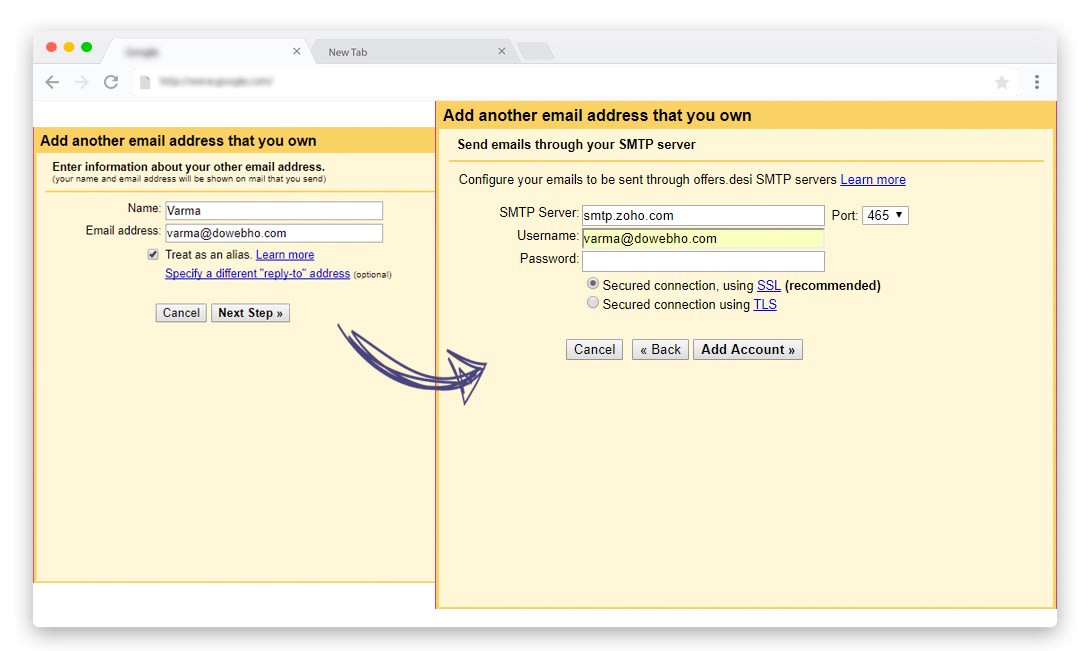
- A small popup window will appear where you need to enter the information about your business email address configured with Zoho Mail. Make sure you have ticked the 'Treat as an alias.' option. (the whole method we are doing to use Gmail to send from your other email addresses is called aliasing).
-
Next, Gmail will ask for the SMTP server details of Zoho Mail. It's important you correctly fill the details, as it will allow Gmail to correctly send emails from your business email address.
-
You can find the SMTP server details of Zoho Mail out here or use the one below.
SMTP server: smtp.zoho.com Port: 465 Username - your business email address from Zoho Mail Password - your password from Zoho Mail Secured connection using SSL (recommended)
-
Next click on the "Add account" to confirm your addition of Zoho Mail as Gmail alias.
-
Gmail will now send a verification email (with verification code) to your business email address in Zoho Mail. As we have already configured the forwarding of emails from Zoho Mail to Gmail, the verification email will arrive directly in your Gmail inbox.
-
Once verified you will see your business email address added to the "Send mail as" setting section.
That's it, you have configured Gmail to send emails from your business email addresses.
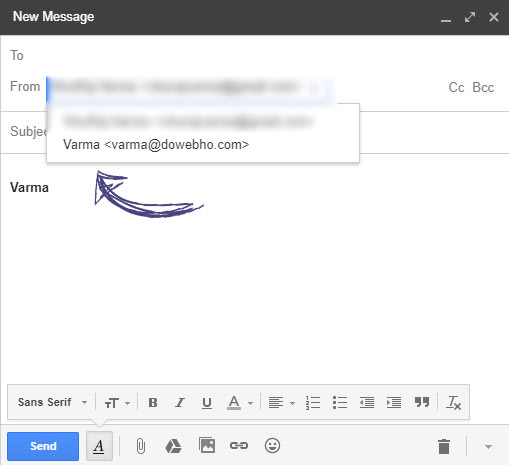
Now, when you compose an email or reply to an email from Gmail, you can select your newly set up business email address from the drop-down in the "From" field. Mails will be sent from Gmail, which will be routed through Zoho Mail SMTP server and delivered to your recipient.
Gmail alias with Zoho Mail two-factor authentication
Sometimes, you may get a "Message not delivered" error while sending from your Zoho Mail business email configured on Gmail alias. I also faced the same issue and some digging revealed the cause to be the Two Factor Authentication (TFA) enabled for the business account in Zoho Mail.
To resolve the issue, will need to generate an application-specific password from your Zoho account settings. Then use that password while configuring Gmail alias.
- Log in to your Zoho Mail, click on the user icon (top right corner) and select "My Account".
- Under your Zoho account, choose the "Two Factor Authentication (TFA)" settings.
- There you can create new "Application Specific Passwords" for the Gmail alias configuration. (Step 3 from above, while adding Zoho SMTP server details).
Google G Suite
If you want to avoid all the above troubles of configuring different accounts, then I would suggest subscribing to Google G Suite (formerly Google Apps). It's everything you loved about Google products like Gmail, Google Drive, Docs and Calendar packed in an affordable package for your business.
- G Suite offers world-class, secure, business email solution.
- You also get access to the full suite of Google Apps including Gmail, Google Drive, Docs and Calendar.
- Priority support from Google.
- Price starts as low as $5 per user/business email address (or around INR 150 per user).
If you want to try out G Suite for your business, we can make it more affordable. Use the below special coupon codes to get up to 20 percent flat discount on your first year's subscription to G Suite.
C6KCNKQYTV7NHDC or 3AY6447W4QDUTCG
These coupons are valid until March 2018. For applying this coupon codes, head over to your G Suite billing section and use this coupon code along with your payment method.
Hope you got a cost-effective way to set up and manage a business/domain email address. If you have any doubts configuring your business email with Zoho Mail or Gmail, let me know in the comment section below.