You may have received the big bold warning "Optimize your images" while testing out your WordPress site in tools like Google Lighthouse/PageSpeed and Gtmetrix. You need to properly optimise, resize and compress images so that your site loads faster even in a slow internet connection. We said 'properly' because, while optimising, resizing and compressing the image, it should NOT lose much of its quality. You need to make sure the images never get pixelated or have distorted colour palettes while optimising.
How do you do that? Here let's look at some of the best image compression and optimising plugins and online tools (both free and paid) for WordPress.

Before we go further, you should know also about Lossy and Lossless image compression. Lossy image compression offers the smallest optimized images with a slight loss in the picture quality. Whereas the lossless image compression optimises the images pixel-by-pixel without much quality loss, but there would only be a smaller size reduction.
Image Compression and Optimization Plugins
For most of the small or medium size WordPress sites, free options available in the below-recommended image compression and optimization plugins would suffice to their requirements. You could freely (without paying any money or subscribing to PRO/Premium plans) use these plugins to optimise all of your existing and future image uploads.
But, for large WordPress sites, which have lots of existing images and there is a definite chance of more image uploads in future, you may want to consider going for the premium/pro paid options. This would help you save time and effort by automating the whole process.
EWWW Image Optimizer
EWWW Image Optimizer is one of the best image optimization plugins for WordPress. The main advantage of using this plugin is that it uses tools from your server (shared, VPS/Dedicated or cloud). The plugin can effectively utilise your server resources like jpegtran, optipng, pngout, pngquant, gifsicle, cwebp library to offer both lossless and lossy image compression.
So, that's not paying for any API, no speed limits and you get image compression for unlimited file size. This plugin is also compatible with WooCommerce, NextGen Gallery, FlaGallery or any gallery plugin you would use with a folder selector.
Features
- Free image compression and optimization with no size and speed limit.
- Supports both lossless and lossy compression options.
- It compresses every image size auto-generated by WordPress.
- Can optimize images under any WordPress folder like your WordPress theme folder.
- Built-in image resizing option.
- Support for WP-CLI.
With the above advantage, there are few cons for the EWWW Image Optimizer WordPress plugins. As the plugin utilises your server resources for image optimization, the server load may shoot up, which may cause problems if you're on shared hosting or not correctly managed servers. To overcome this, EWWW Image Optimizer also offers a paid API option which uses its specialized servers for image compression and optimization. Thus offloading the resource demands of image optimization from your server. It also comes with further advantages over the free option like:
- Up to 80 per cent premium image compression.
- Converted and serve images in next-gen WebP image format.
- CDN support + save storage space on your server.
- Image resized to fit your web page and device size.
- Secured API access via top SSL encryption.
Ease of use
It pretty easy to use the EWWW Image Optimizer WordPress plugin. Once you have installed and activated the plugin, head over to Settings > EWWW Image Optimizer. For most use case, just start with the default settings. If you have a paid account, then you could add the purchased API key to unlock additional compression levels (for free usage, just leave the Optimization API Key option as blank).
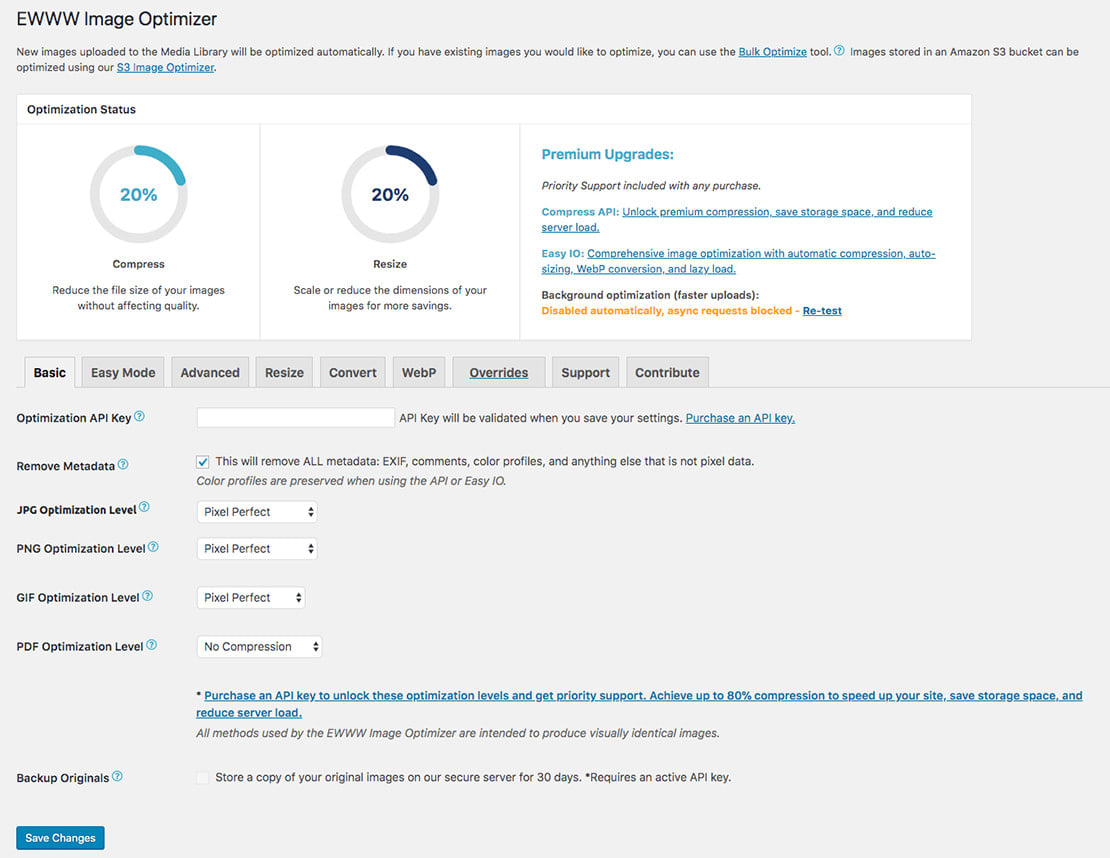
That's it, from now on every image you upload to WordPress post, pages, custom post types and media library would go through EWWW Image Optimizer and will get compressed. For all existing images in your WordPress media library, run the bulk image optimize option under Media > Bulk Optimize.
There is an advanced option in the plugin settings, where you could fine-tune the various image formats optimization levels. You could resize images, convert them from one format to another (PNG to JPG, GIF to PNG etc) and enable JPG/PNG to next-gen WebP image format.
For small sites with adequate server resources, I would recommend this plugin. If in case it starts hitting on your server resources, then I would suggest trying their paid API option.
ShortPixel Image Optimizer
ShortPixel uses one of the advanced compression technology to reduce your image size without losing quality. It uses minimal server resources (as image optimization is happening on their servers), supports lossy and lossless optimization, no file size limit and much more.
Features
- Supports Lossy and Lossless compression.
- Supports JPG, PNG, GIF (still or animated) images and PDF documents.
- No file size limit.
- Compatible with most of the WordPress gallery plugins (NextGEN gallery, Foo Gallery), sliders, WooCommerce, WPML, WP offload Media and more.
- Let you keep or remove EXIF data from your compressed images.
- Supports CMYK to RGB conversion.
- One-click bulk optimizes option for all the existing images in Media Library.
- Save, backup your original images in a separate folder and restore them at any time.
- GDPR compliant
ShortPixel offers both free and paid option. The free quota has a limit of 100 free image compression per month with no size limit. Additional paid image compression credits can be purchased for as little at $9.99, which offers 10,000 image credits (this purchased image credits never expires). There is also a monthly paid subscription option which starts at $4.99 for 5,000 image credits per month.
One cool tip, you could get 100-lifetime monthly additional image credits for each referred active user to ShortPixel.
Ease of use
Once you install and activate the ShortPixel Image Optimizer WordPress plugin, the first thing you need to do is to create a free account at ShortPixel.com, log in to their admin area and grab the API key. You could also request an API key directly from the plugin settings under Settings > ShortPixel (API key will be emailed to your provided e-mail address).
Add the API key in the ShortPixel settings and you're good to go. In the setting, you could choose from lossy and lossless compression option, remove or keep EXIF data, image backups, etc. There is also a "statistics" tab where you could know about the number of images compressed and image credits left in your account.
For new images, ShortPixel will compress it automatically as you complete the upload. For existing images, choose the bulk optimization option under Media > Bulk ShortPixel.
TinyPNG
TinyPNG is somewhat a noun for online image compression. You ask any digital marketing guys or developers, they all knew and loved TinyPNG as their first place to go for image compression. As an online tool (both TinyPNG.com and TinyJPG.com) offers highly optimized JPEG, PNG and even APNG image compression on the fly.
TinyPNG offers the same image compression technique for WordPress users. The WordPress plugin comes with a big advantage (when compared to its online tool) like no image file size limit and 500 image compression credit each month. For small and medium WordPress blogs this limit is somewhat enough for their 1-3 years of journey.
Features
- Automatically compress new images on upload and bulk compress for existing images.
- Supports compression of JPEG, PNG and animated PNG
- No file size limits.
- Convert CMYK to RGB.
- Auto resize uploaded images to preset maximum width and/or height.
- A single API key can be used for multiple sites.
As we said earlier TinyPNG WordPress plugin in its free option can compress 500 images each month. You could opt for paid API if you exceed this free limit, which would cost roughly $0.002 per image. That's around $13.50 for 2000 image compression. You're only billed if you exceed the 500 image compression each month.
Ease of use
Once you have installed and activated the plugin in your WordPress site, head over to Settings > Compress JPEG & PNG images (yup, that's the plugin name). There you would first need to register with TinyPNG using your name and email ID to get the free API key. You could also manually go to TinyPNG developer section and register an account for the API key.
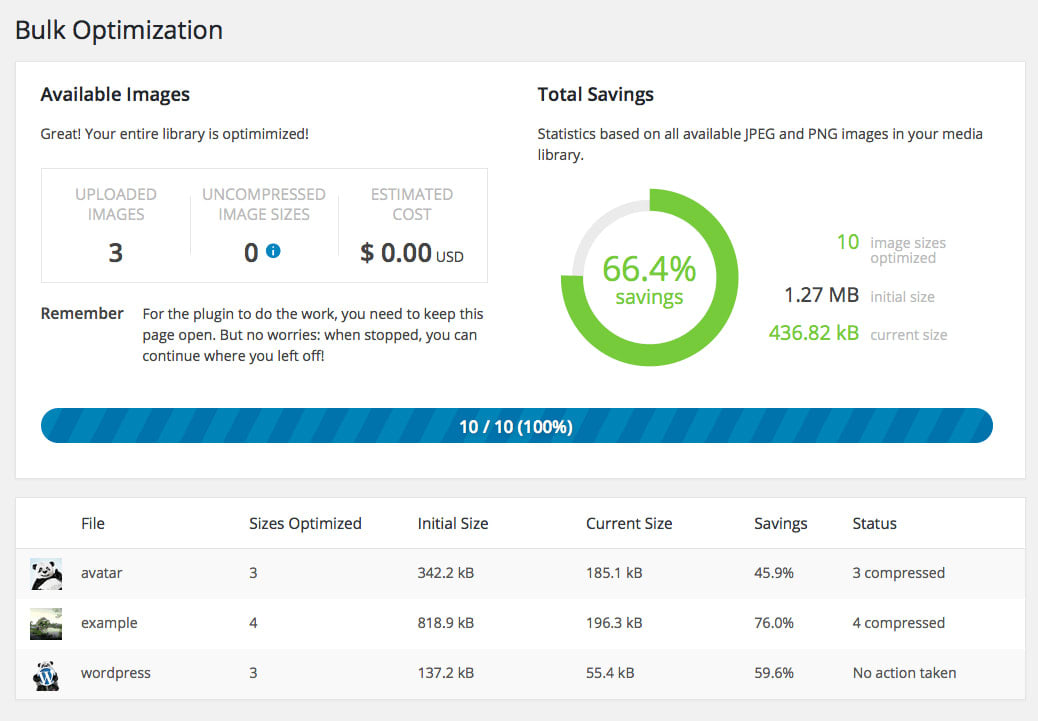
Once you add the API key to the plugin settings, it would then start optimising your images. You could also optimize and compress all of your old images in Media Library by heading to Media > Bulk Optimization option.
Imagify
Imagify can optimize all your images in one click, resize them, save a backup of the original with quick restore option and comes with 3 different levels of compression. Most importantly this plugin is created by the same team behind WP Rocket, one of the best caching plugins for WordPress.
Based on your blog category, you could choose from Normal, Aggressive and Ultra levels of compression:
- Normal level is based on lossless compression algorithm, thus image quality is retained but with a reduction in image size.
- Aggressive level is based on a lossy compression algorithm. There is a tiny loss in image quality, which is hardly noticeable but the image size is reduced considerably.
- Ultra level offers the strongest compression using a lossy algorithm.
I would suggest choosing the aggressive optimization level in the Imagify setting for better compression and a smaller file size footprint.
Features
- The supported format includes JPGs, PNGs and GIFs.
- Resize images based on your preset size or a percentage.
- Can keep or remove EXIF data from images.
- Support converting images to WebP image format.
- Three-level of image compression - Normal, Aggressive ad Ultra.
- Bulk Optimizer to optimize all your existing images in Media Library.
- Backup original images with one click restoring.
Imagify has both free and paid option for image compression. With the free option, you could optimize 25MB of images every month (that's good for around 250 images). If you exceed this limit, then you can opt for the paid monthly plans which start at $4.99 per month for 1GB of data (around 10,000 images) or choose one time plans starting at $9.99 for 1GB quota.
Ease of use
Imagify WordPress image optimising plugin has one of the best front UI to work with. Once you have installed and activated the plugin, create a free account with Imagify and grab your free API key.
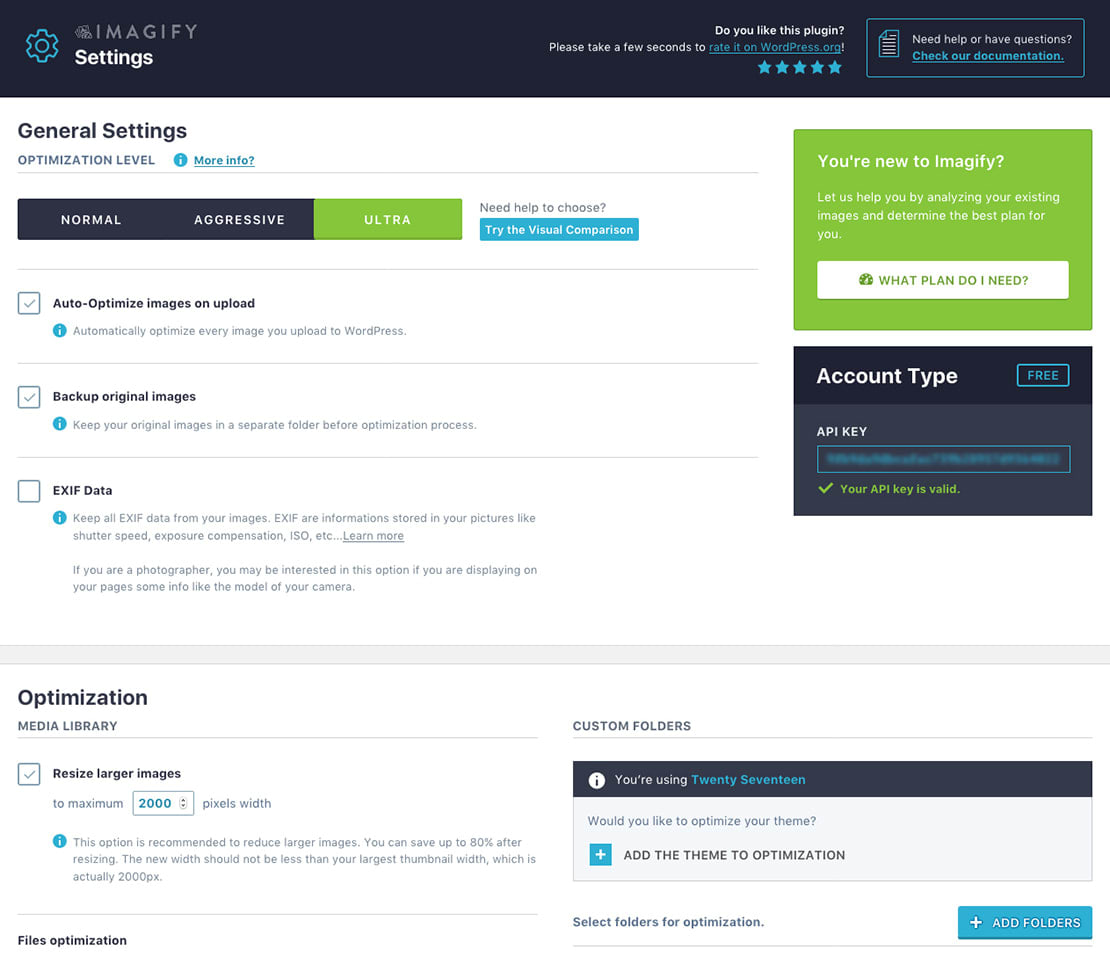
In the Imagify settings (Settings > Imagify) choose your optimization level and other options like backup original images, keep or remove EXIF data etc. For bulk image optimisation head to Media > Bulk Optimization, there you could optimize all your old images uploaded to Media Library and any custom folders like theme folder.
Optimus
Optimus WordPress image optimizer plugin offers a simple solution with its lossless compression for PNG images and slightly lossy compression of JPEG images. The plugin is from the people behind KeyCDN and its main advantage is efficiency and speed.
If you're one of the old Smush.it users, then Optimus would be the appropriate replacement. It offers unlimited compression for all images under 100KB for free.
Features
- Reduction of file size up to 70% with no change in visible image quality.
- Supports JPEG and PNG formats.
- No removal option for EXIF and IPTC in files.
- Quick image loading with Progressive compression.
- Compatible with WordPress multisite, WooCommerce, gallery plugins and slider plugins.
- Transparent data privacy policy.
- No registration or API key needed for free users.
The best advantage of having Optimus is that it can compress all images or unlimited images which are under 100KB. There are three different versions of Optimus account you could choose from.
- Optimus (free): It's the base version or free version where you could compress all images under 100KB each.
- Optimus HQ: It's a premium option, where you could compress all images (unlimited images) with a maximum file size limit of 10 MB each. This plan is priced at $29 per year and can be used for all your personal projects.
- Optimus HQ PRO: It's same as the above Optimus HQ premium version, but with a difference that you could use it for all your customers project if you're running an agency. It's priced at $149 per year.
Premium version of the Optimus plugin supports conversion of images to WebP image format and all image transfer to-and-fro from Optimus server is secured with an HTTPS connection.
Ease of use
Getting started is pretty easy and unlike other plugins, you won't need to register or get an API key for using its free version. With the default settings, all images (< 100KB) you upload would go through Optimus server and will be optimized and compressed. To compress all existing images in your Media Library, go to Tools > Optimus Bulk Optimizer and run the bulk optimizer.
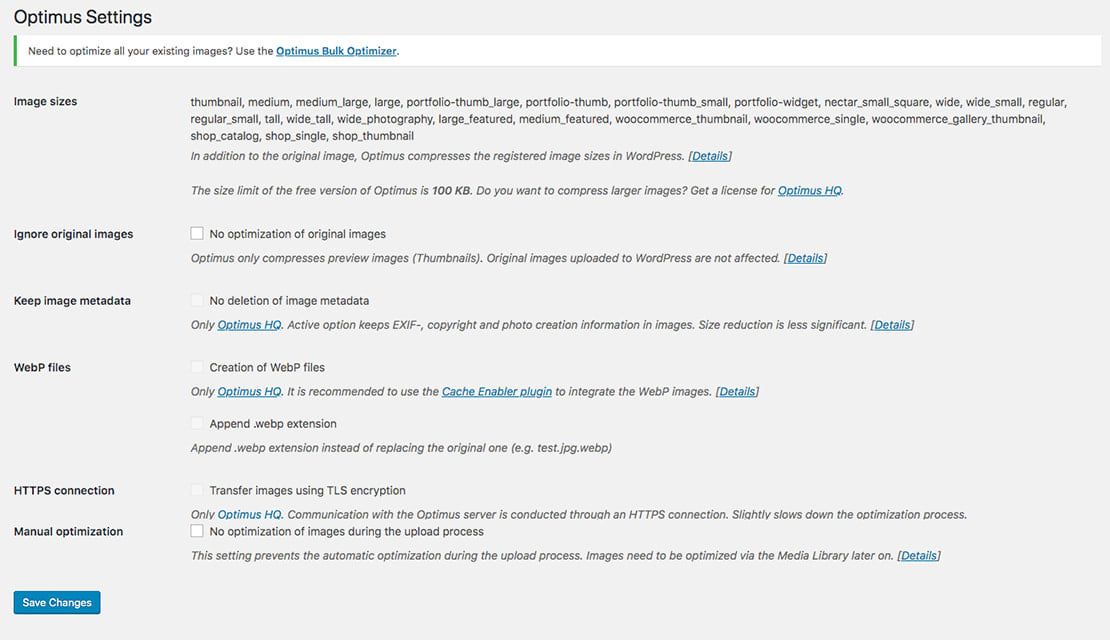
Make sure, you won't refresh the page or stop the bulk optimization in the middle, as it would start compressing the image from the beginning.
If you're choosing the premium version of Optimus or Optimus HQ, you need to register at Optimus and get an API key to use with the plugin. If we compare the paid plans of other image compression plugins, Optimus HQ is worth the money you spend.
Squoosh
Squoosh doesn't have a WordPress plugin yet, still, it's one the most advanced online image compression tool. Its build by Google, so you could think about the engineering behind this tool.
Squoosh is open-source software (you could find the entire code in Github) and offers image optimization with advanced compression, image conversion, and resizing. It can compress large image files with ease and support multiple formats including JPEG and PNG. You could choose different compress modes like OptiPNG, MozJPEG, WebP, Browser PNG, Browser JPEG and Browser WebP. You can also resize images, reduce colour palettes and image quality percentage on the fly. There are advanced options to fine-tune your image optimisation and compression.
Features
- Ease to use and can fine-tune each part of the image compression.
- Can considerably reduce image size without losing quality.
- Support big image files and virtually no size restriction.
- Resize images and Reduce palette.
- Convert images from PNG > JPG > Web
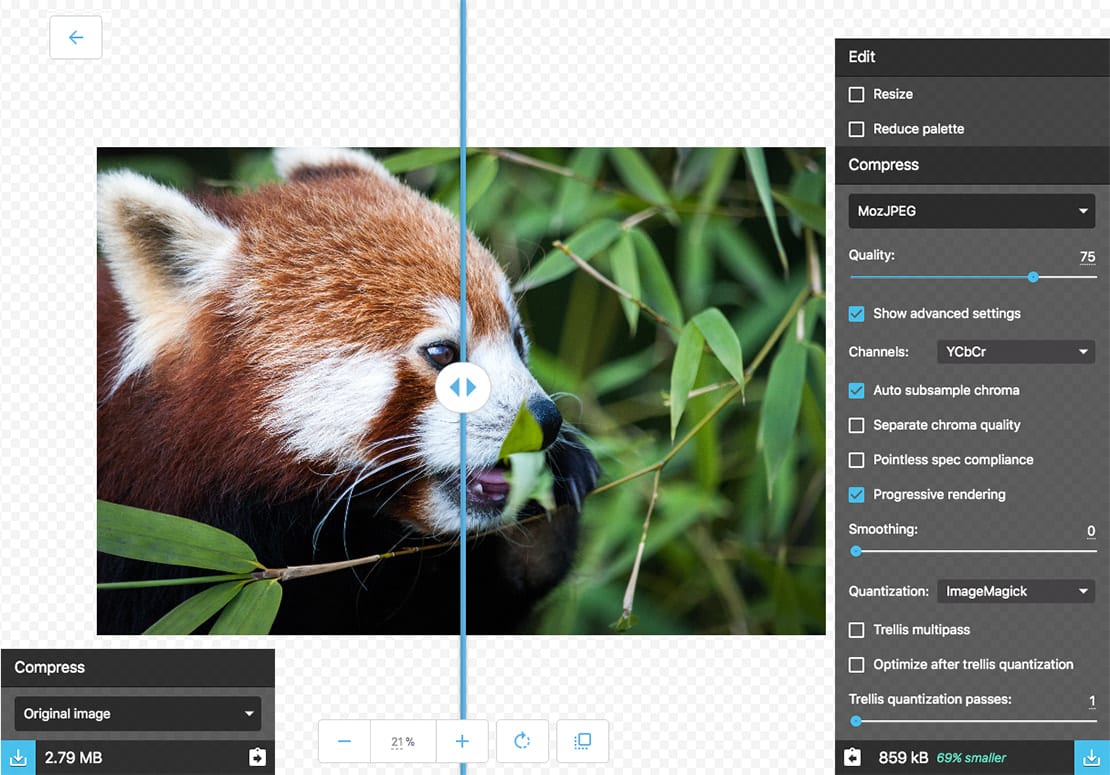
Squoosh biggest limitation is that it can only process one image at a time. So, if you got X number of images, then you would need to run those images through Squoosh individually.
reSmush.it
If you're looking for a free image optimization WordPress plugin with no quota limit and a generous amount of size limit, then reSmush.it Image Optimizer would do the job. The plugin offers free image compression based on reSmush.it API and supports image size of up to 5MB.
reSmush.it is not featured rich as other plugins we talked about earlier, but gets the basics correct. It users PNGQuant, JPEGOptim and OptiPNG library to optimise PNG, JPG, GIF, BMP and TIF pictures.
Features
- Supports PNG, JPG, GIF, BMP and TIF pictures.
- Supports file size of up to 5MB.
- Keep or remove EXIF data from images.
- Original images are backed and image optimization is performed only on copies.
- Can perform image optimization process through CRON tasks
Ease of use
Getting started with reSmush.it is pretty easy. There is no registration or API key required. Once you have installed and activated the plugin, head to Media > reSmush.it for plugin settings. By default optimization level is set to 92, which you can reduce. I would recommend putting in an optimization level of 75 for the best result in image compression and low-quality loss.
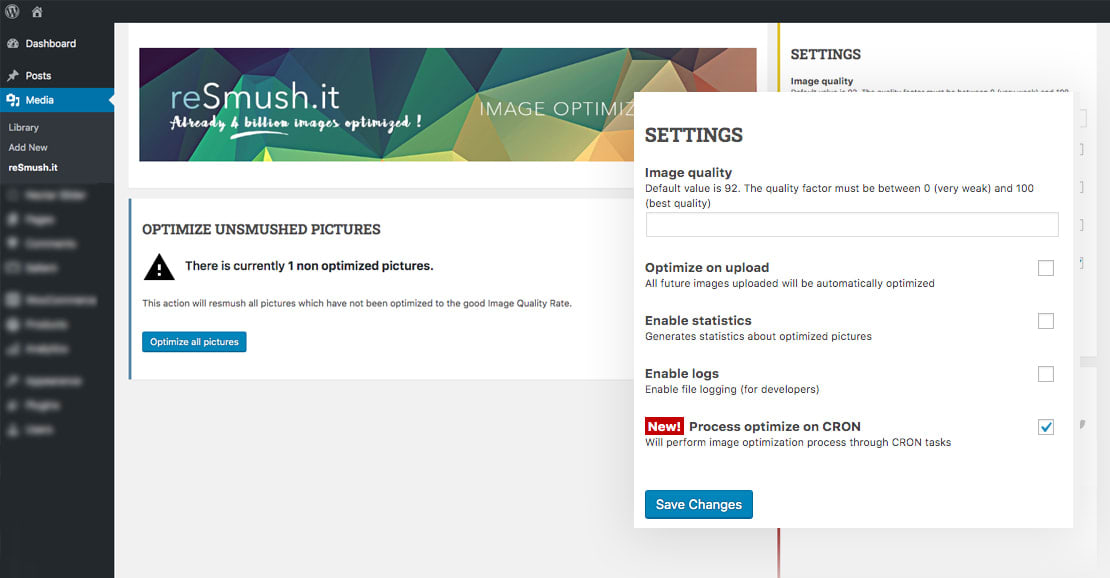
It also packs the bulk optimization settings in the same window, where you could run bulk optimization on all images in Media Library which have not been optimized earlier.
One of its biggest disadvantages of reSmush.it is that the maximum image file size you can run on it is limited to 5MB. There is no premium or paid option to increase the file size limit.
Image compression and optimization play an important part in website speed which inturn affect user experience and more importantly Google SEO rankings. You should optimize and compress every image on your website. I would suggest manually optimising images through online tools like Squoosh or TinyPNG before uploading to WordPress. It has two advantages, one is, all image by default in your site would be well optimized and second, you could avoid installing a third-party WordPress plugin (and paying for its API).
If you prefer adding an image compression plugin to WordPress, then I would suggest going with ShortPixels and Optimus HQ, as they are feature-rich and offers value for money (if you're opting for the paid options).
So, which image compression plugins are you using and why? Do you know any other good image compression plugins for WordPress or online tools? Let me know in the comment section below or via Twitter.