Hope you have read our earlier tutorial on building a super optimized WordPress site with EasyEngine on DigitalOcean. At that time we used EasyEngine 3 (EEv3) as the base of our build. It was fast, super easy and offered a high-performance server for our WordPress sites. Down the years, EasyEngine 4 (EEv4) was launched which was a complete rewrite in terms of programming language and internal architecture. They moved their entire programming language from Python (EEv3) to PHP (EEv4) and architecture from using native OS packages in EEv3 to Docker images (EEv4).
There's nothing wrong with EEv4, but the simplicity with which EEv3 was working was gone. Also, the original developers of EasyEngine abandoned stopped working on EEv3, leaving behind lots of bugs and our desire for an updated web stack (officially no support after January 31, 2019 ).
Meet WordOps an EasyEngine v3 fork. With a great team overseeing the development and thriving community, WordOps is much more than an up-to-date version of EEv3. You get several new features including latest and updated web development stack, Linux kernel optimizations, Cloudflare HTTP/2 HPACK support, Let's Encrypt wildcard SSL certificates with DNS API validation support, to name a few. The team is also actively hearing their users and adding more features to the stack.
Key features of WordOps
- Super easy installation and management of WordPress sites.
- Automated and optimized WordPress, Nginx, PHP, MySQL and Redis installation.
- Full support for migration from EasyEngine v3 to WordOps.
- Custom Nginx build (Nginx 1.16.1 with TLS v1.3) with Cloudflare HTTP/2 HPACK and Brotli compression support.
- Let's Encrypt SSL certificates for domains, subdomain and even Wildcard SSL certificate support.
- Multiple cache options for your WordPress sites - Nginx fastcgi cache, Redis cache, WP Super Cache, WP Rocket cache and Cache enabler.
- Server monitoring with Netdata
- Modern TLS protocols and HSTS support

If you're running EasyEngine v3, you could simply and safely migrate to WordOps by running the following install script command.
wget -qO wo wops.cc && sudo bash wo
It would backup all previous EasyEngine configurations, install WordOps stack, create all-new Nginx configurations before syncing the old Nginx directory with the new one. For most EEv3 users, this would safely migrate EasyEngine v3 to WordOps. For some, there may be a few post-installation steps to follow which you could read in this guide.
Building a High-Performance WordPress site with WordOps on DigitalOcean
Back to our main topic, let's build a super fast and high-performance web stack with WordOps and our preferred cloud hosting provider DigitalOcean. It will have the cutting edge features like NGINX which is a high-performance HTTP server and reverse proxy, MySQL/MariaDB, PHP 7.3/PHP 7.4, Nginx FastCGI Cache or Nginx Redis Cache and HTTP/2. We will also add a free SSL certificate to our WordPress site with Let’s Encrypt.
All that with very few commands and hardly in 15-25 minutes, you will be running your own self-hosted super optimized WordPress site or blog.
Before going further, quickly spin-off an SSD server (or Droplets) on DigitalOcean, which has servers starting as low as $5 per month. New users to DigitalOcean would get $100 free credit, which would easily cover your 60 days of hosting charges. The $5 Droplet comes with 1GB RAM, 25GB SSD disk and 1vCPU, which is more than enough for a few WordPress sites. You could also easily upgrade the resources like RAM, storage or CPU to accommodate your increasing website traffic and load.
The whole guide needs some level of technical understanding of how a server works and manage it.
Setting up DigitalOcean droplet for WordOps and WordPress
Create your $5 droplet in DigitalOcean and choose the Ubuntu 20.04.1 (LTS) x64 image. Once the droplet has been created (which hardly takes 55 seconds), you need to do some initial server setup (mostly to secure your server). You can use Putty (Windows) or Terminal (Mac) to login to your server via SSH. You will be asked to authenticate using the root password.
ssh root@your_digitalocean_server_ip
The root user holds lots and most of the administrative privileges in a Linux environment. I would recommend not using it regularly for security reasons. Instead, create an alternative user account with limited privileges. This can be done by the following command.
adduser newusername
Here you will be asked some basic questions (which you can skip) and a strong password. Once you have created the new user account, you now need to give some administrative privileges (or called "superuser") This can be done by assigning the new user to the "sudo" group. By doing so, the new user account can run commands with administrative privileges by simply putting the word sudo before each command.
usermod -aG sudo newusername
Now you are ready to log out as root user and login back as the newly created user. Before you log out of the server as the root user, you need to test if the newly created user account works. That can be done by opening a new putty/terminal window and logging in as the new user. Do not disconnect from root account until you have successfully logged in as the new user via SSH.
Basic Firewall with DigitalOcean Cloud FireWalls
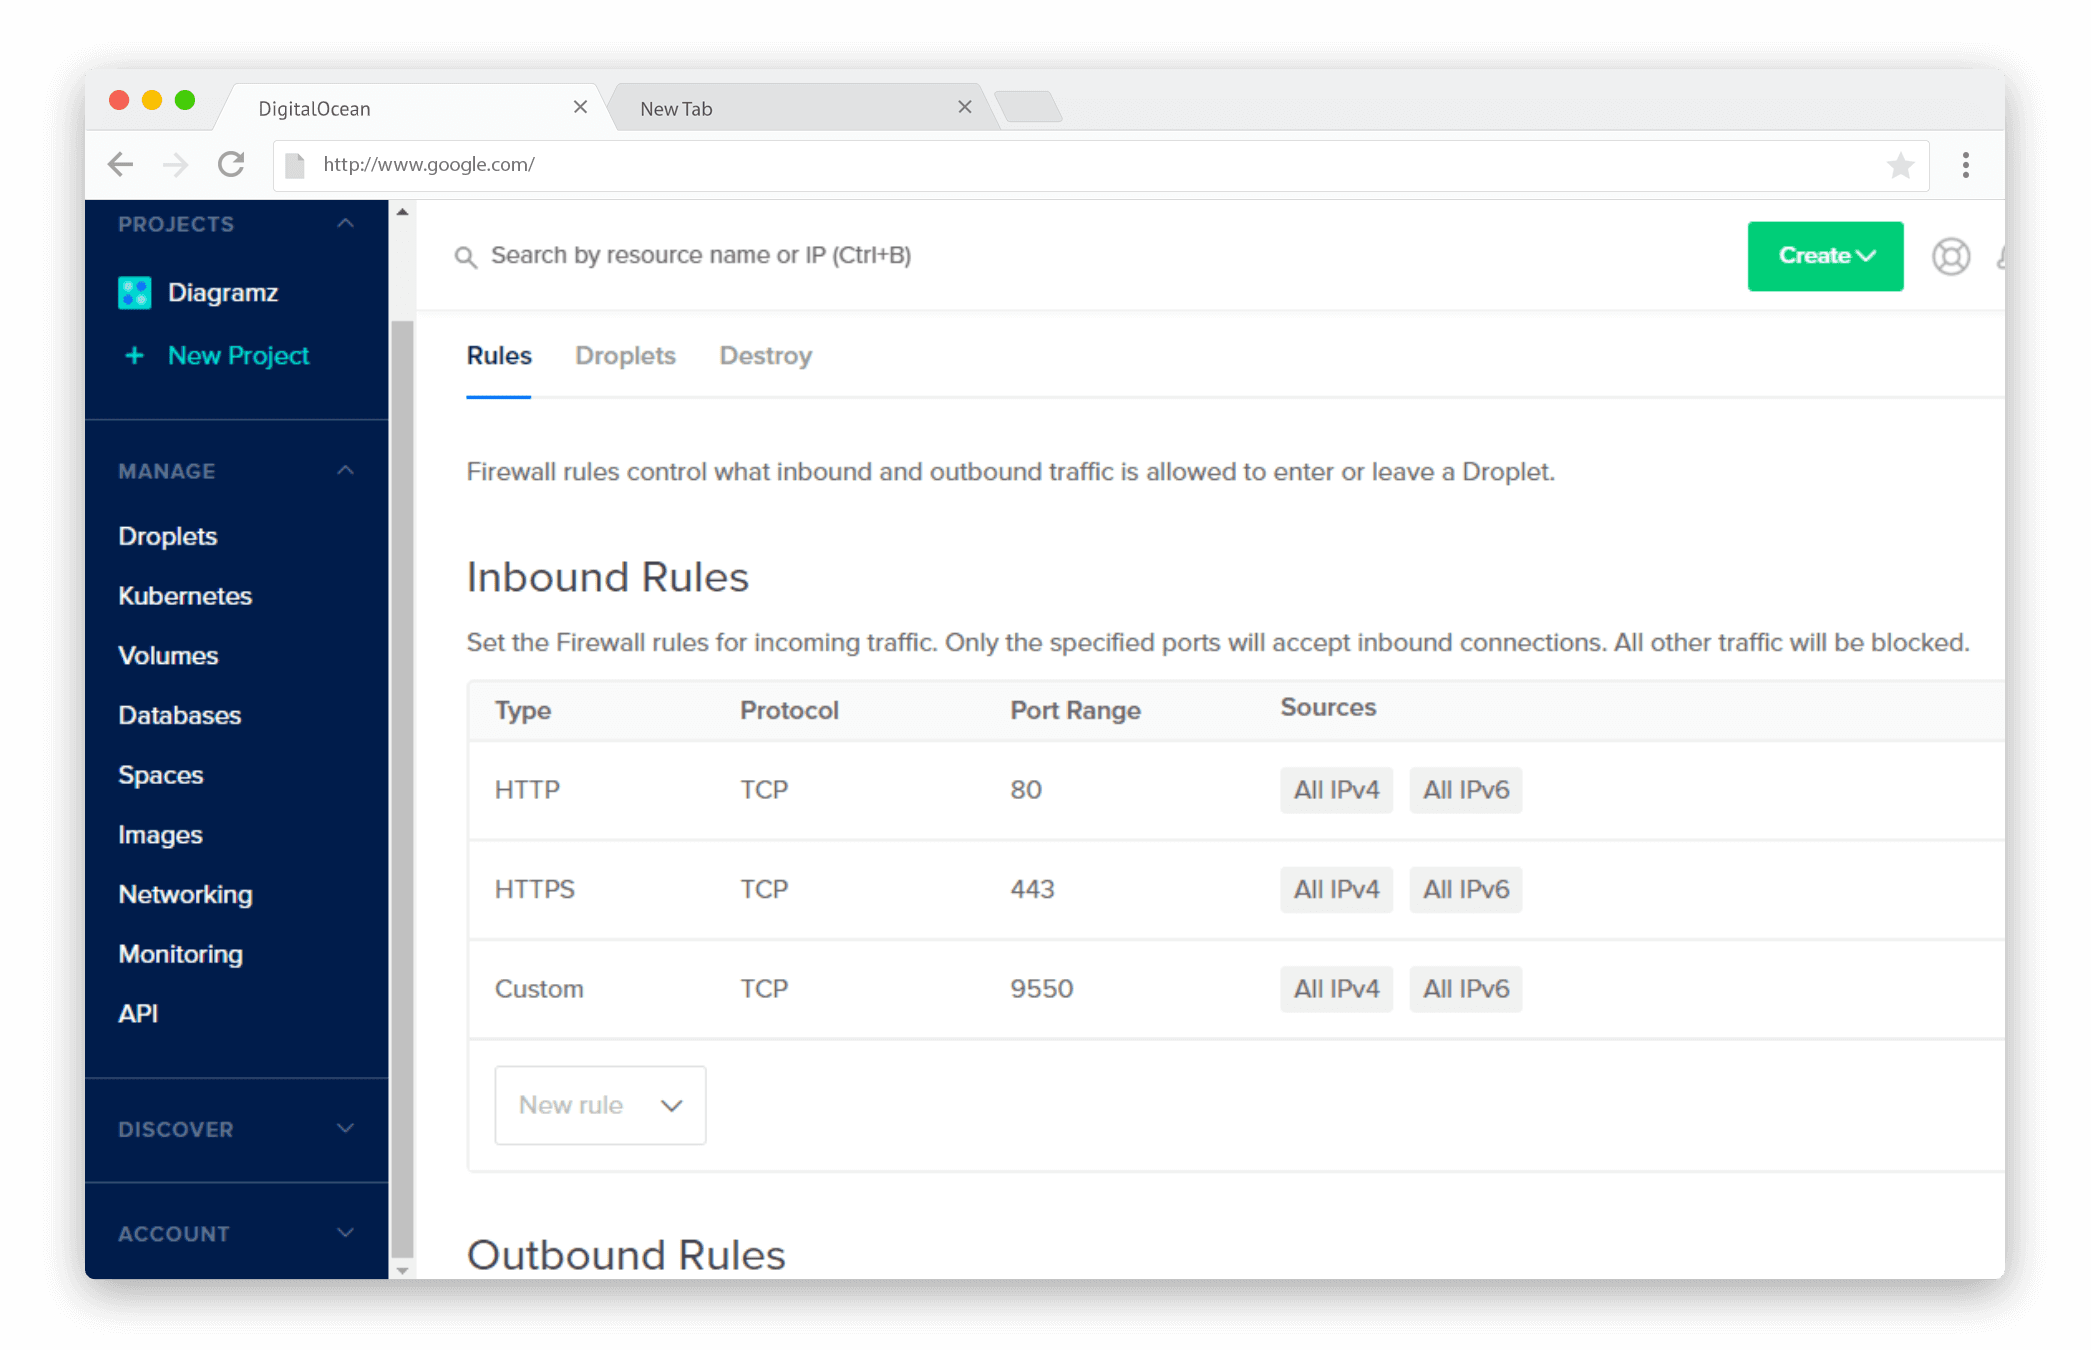
Next step is to set up a basic Firewall for your new server. Normally in Ubuntu, you have to configure the UFW firewall to allow or block certain connections. But with DigitalOcean you could create Cloud Firewalls which provide a network-based, stateful firewall service for all your Droplets. That’s sort of visual representation to the command line UFW firewall.

Configure the Cloud Firewalls in your DigitalOcean Control Panel under the 'Networking' section. You need to add SSH (22), HTTP (80), HTTPS (443) and a custom port (22222) for the WordOps admin tools. Other default settings in Inbound and Outbound rules are more than enough.
Installing and Configuring WordOps
So, you have set up your DigitalOcean droplet and made it secure with a basic firewall. Now you need the best web development stack that can run your WordPress website. Instal WordOps in just a few quick commands.
sudo wget -qO wo wops.cc && sudo bash wo
This single line command will update the packages list, enables automated security updates with unattended-upgrades, create WordOps directories, install WordOps dependencies and then install WordOps, acme.sh for Let's Encrypt and WP-CLI, the command-line interface for WordPress. During the installation, it will ask for some basic details like name and email ID.
Once you have WordOps up and running on your server, all it takes a single command to build that high-performance WordPress site.
sudo wo site create domain.tld --wpfc  --php73 -le

#For PHP 7.4 support

sudo wo site create domain.tld --wpfc  --php74 -le
The above command would build a WordPress site with Nginx fastcgi cache and SSL certificate, which is our recommended combination. You could find the rest of the commands in WordOps documentation.
Note: WordPress with Redis cache will have the results of common database queries on your site cached and speed up the display of a page. Whereas, in WordPress with fastCGI cache, the whole page is cached after it's been generated. Both are good in its own ways, but fastCGI cache is recommended if you're using a single-server environment. Redis cache is better when you need to share cached data across multiple servers.
wo site create domain.tld --wpredis --php73 -le
#WordPress site + Redis cache + PHP 7.3 + Let's Encrypt SSL

wo site create domain.tld --wpsc --php73 -le
#WordPress site + WordPress Super Cache + PHP 7.3 + Let's Encrypt SSL

wo site create domain.tld --wprocket --php73 -le
#WordPress site + WordPress Rocket Cache + PHP 7.3 + Let's Encrypt SSL

wo site create domain.tld --wpce --php73 -le
#WordPress site + WordPress Cache enabler + PHP 7.3 + Let's Encrypt SSL
If you're looking to further customize the WordPress build process, like choosing a different admin name (default is 'admin') or different email address then use the below WordOps command.
sudo wo site create domain.tld --wpfc --user=username --email=email@example.com --php74 -le
Here instead of ‘ domain.tld’ use your domain name (don’t forget to update your domain DNS to the new server IP). Instead of ‘username ’ use a unique WordPress admin username, which is an important part of WordPress security. Also in the ’email@example.com’ use your website’s admin email address.
If in any WordOps fails to issue Let's Encrypt SSL certificate, then you could run the following command to force WordOps to issue a certificate even if the domain doesn't resolve your server IP.
wo site update domain.tld -le --force
Once WordOps does its work, you will be shown the WordPress installation details which also include the admin password. Do copy the password and remember it as it will be needed to log in to your WordPress admin backend.
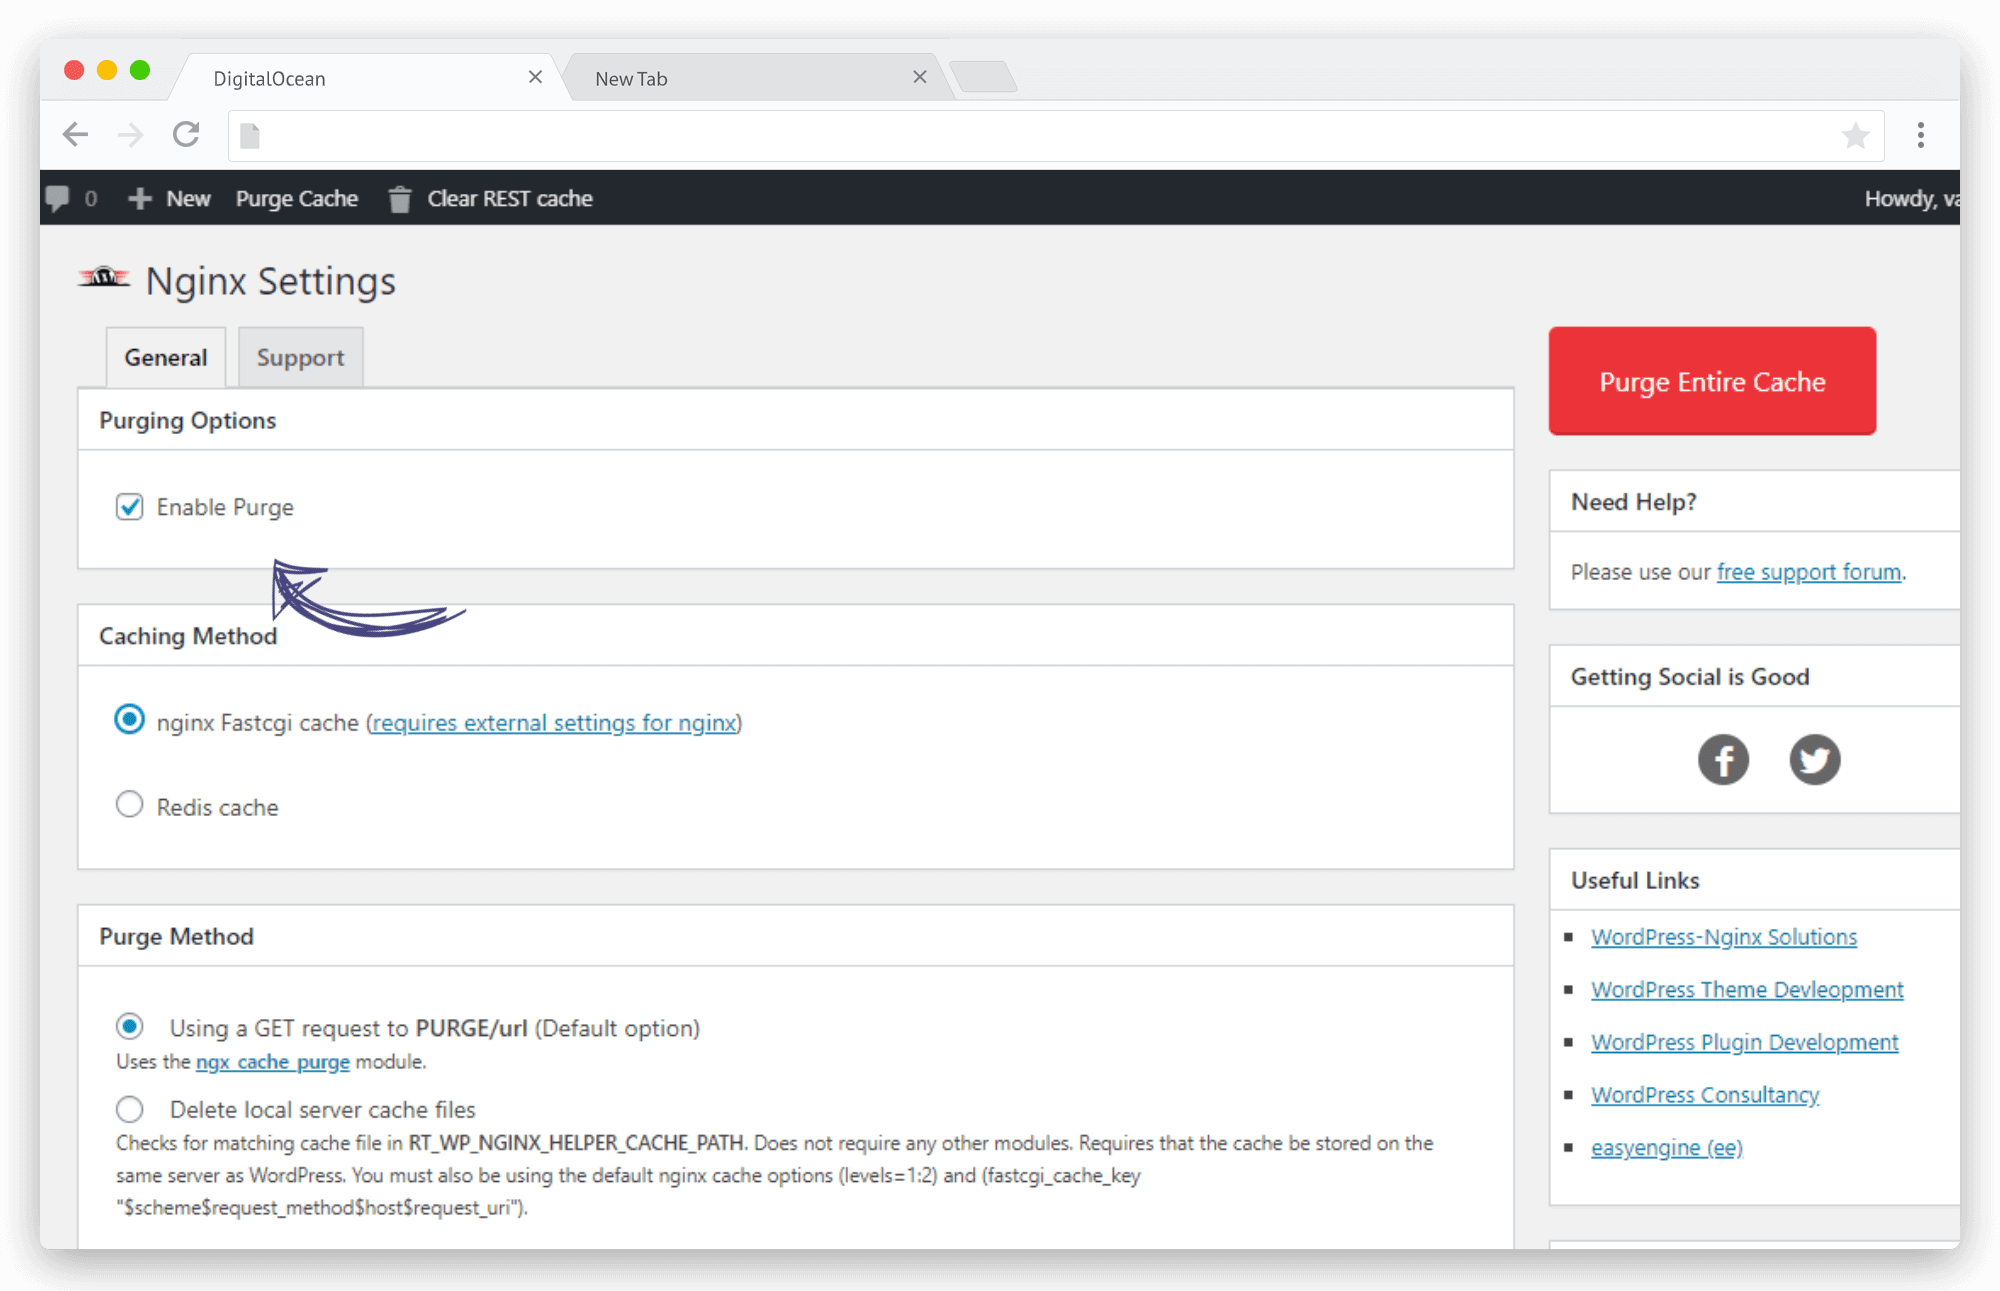
Next, log in to your newly installed WordPress website (domain.tld/wp-admin). Under settings, there will be a pre-installed and activated WordPress plugin - Nginx Helper. (If not activated you can easily activate from the Plugin‘s section). In the Nginx Helper plugin, you need to enable Purge and choose the caching method as "nginx Fastcgi cache" or "Redis cache" based on your installed cache preferences.

That’s it! You have successfully created a super optimised and high-performance WordPress site with latest web stack - NGINX, PHP7.4, FastCGI/Redis Cache and fully secured it with free Let’s Encrypt SSL certificate. Got any sort of doubts or stuck anywhere during the installation process, let me know I would be more than happy to help you out.