Did you know? Each redirects from one page to another page or to an external URL you add to your website (may it be a WordPress site or other CMS) it is going to affect performance and most importantly will affect your server resources (a little bit but still it can get pretty dirty when on shared hosting and end up with 100+ bulk redirects).
In the case of WordPress, we use plugins to do this task, and most of these plugins use wp_redirect function to achieve the redirection. Thus, every time a redirection is happening, it going to execute PHP code on the server, to first process the incoming request and then forward or redirect the request to the final destination. The whole process is resource-intensive and also time-consuming.
The first thing we can do to revive our website from this redirect burden is to move the redirects directly to server-level bypassing the whole code execution. If you are on an Apache or Lightspeed server, you need to add the rewrite codes to .htacces file. Whereas, when on high-performance Nginx server you need to add the rewrite rules directly to the server block entry in the server configuration file.

However, the above method does add a little bit effort to your server, as the redirection request is still hitting your server. Well, there is a method to avoid this. Put the bulk URL redirection on the cloud on the edge network nearest to your customer, but detached from your server.
Cloudflare Workers, some of you have already heard about it, for others, it is a unique service from Cloudflare which allows you to run JavaScript code on their edge servers. Your code is thus powered by Cloudflare's vast network which is milliseconds away from virtually every Internet user. These allow you to intercept request to your website, modify that request and return it, all without hitting your origin server.
Website Bulk Redirects using Cloudflare Workers
Assuming you already have configured your domain with Cloudflare utilising it is awesome DNS, CDN and DDoS protection service. Login to your Cloudflare account and enable Workers under the "Product" section. There is a free plan and $5 per month paid plan (Bundle Workers plan) however, for our need, we only required the free one.
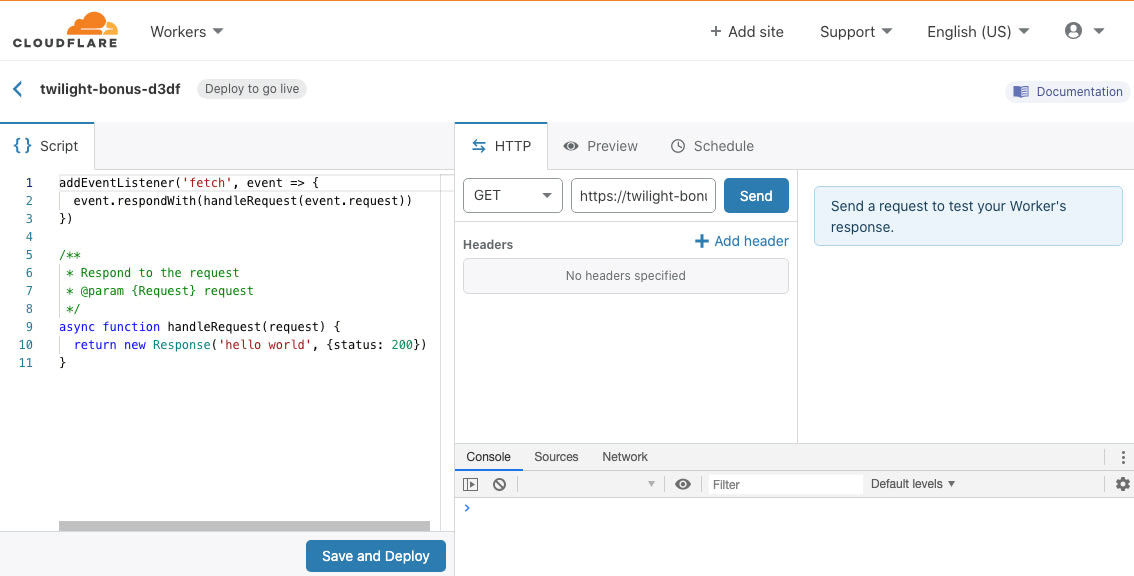
Click on the “Create a Worker” to build your first Cloudflare Workers. It will then take you to a detailed development environment with an auto-assigned worker sub-domain.

In the code editor, remove the existing default code and input the following boilerplate Javascript code.
const redirectMap = new Map([
  ["/bulkurl1", "https://mysite.com/newurl1"],
  ["/bulkurl2", "https://mysite.com/newurlt2"],
  ["/bulkurl3", "https://mysite.com/newurl3"],
  ["/bulkurl4", "https://mysite.com/newurl4"],
])

async function handleRequest(request) {
  const requestURL = new URL(request.url)
  const path = requestURL.pathname;
  const location = redirectMap.get(path)
  if (location) {
    return Response.redirect(location, 301)
  }
  // If request not in map, return the original request
  return fetch(request)
}

addEventListener("fetch", async event => {
  event.respondWith(handleRequest(event.request))
})
This code is taken directly from Cloudflare's example of Bulk Redirect and slightly modified to work with our usual URL pattern. What the code does is read the pathname of the incoming request URL and checks with our constructed reference list, and then decide where to redirect. The redirection will also be a 301 permanent redirect, sorting out your SEO issue too. Just make sure you have updated the redirect reference list with the correct URL pathname and where to redirect it.
You could test the script right from the Workers code editor window (HTTP view). Just construct specific URL requests to our Worker and see the response. If everything works, click on Save and Deploy to make the Worker live.
Git repo with auto-deploy
We also have set up a GitHub repository with the Cloudflare Workers deploy button that let you deploy the entire project to the Workers platform in under five minutes. What it does is fork the project to your account and adds GitHub Actions workflow to your project. Thus you can directly edit the code and push it to your git. This in-turn triggers the Github Actions and publishes the code to your Cloudflare Workers (pushing right to the edge network).
Workers to domain route
Now that our Workers script is ready and fully functional, we need to map this to a domain. For that head over to your Cloudflare dashboard and choose the domain to which you need to apply the redirects too. Under the individual domain section, choose the “Workers” tab and there you will find an option saying “Add route”.

When adding the “Route” entry, correctly define the route or domain path were the Worker script will get applied. You can choose to apply the Worker script to the root domain by defining ‘__.mysite.com/__, which matches all URLs and schemes for the site or to a subdomain like “redirect.mysite.com/*”. The second method is usually used for affiliate link cloaking. See the Cloudflare docs to learn about various route patterns you can use.
Finally, we also select the previously created Worker script and push the save button to make the whole thing live. When we say taking it to live, all changes are pushed to entire Cloudflare edge networks instantly. So make sure the routes and reference links in your Worker script is correct.