This article is based on EasyEngine v3 (EEv3) which reached the end of life (EOL) on January 31, 2019. We recommend WordOps (EEv3 fork) which is much more than an up-to-date version of EEv3. Read the new article to build a high performance and optimized WordPress site with WordOps.
Do you want to start a website that's top on speed, top on performance and top on security? Let's learn how to build that site with a combination of world's most favourite content management system (CMS) platform WordPress, the super-easy way to build and manage a fast web server software with EasyEngine and the best cloud hosting designed for developers - DigitalOcean.
With this guide, you will be building a super fast and high performance oriented web server with EasyEngine v3. It will have the cutting edge features like NGINX which is a high-performance HTTP server and reverse proxy, MySQL, Postfix, PHP 7, Nginx FastCGI Cache or Nginx Redis Cache and HTTP/2. You will even add a free SSL certificate for your WordPress website with Let's Encrypt. All that with very few commands and hardly within 15-25 minutes you will be running your self-hosted WordPress website.

Before going further, let me give a brief on DigitalOcean who is known for its cloud computing services that are designed for developers like us. You can spin off an SSD server (or Droplet as called by DigitalOcean) with complete root access for just $5 per month and in only 55 seconds. You can confidently run a WordPress website with around 15000 to 20000 unique visitors per day on a $5 DigitalOcean droplet plan. That best part DigitalOcean offers discount coupons that can be redeemed for credits worth $10 to $25. Using these free credits you can run a cloud server easily for four to six months period.
The whole guide needs some level of technical understanding of how a server works and manage it.
Setting up DigitalOcean droplet for EasyEngine and WordPress
Create your $5 droplet in DigitalOcean and choose the Ubuntu 16.04 image. The $5 DigitalOcean comes with 512MB RAM, 20GB SSD disk and 1vCPU which is more than enough for a new WordPress installation. You can at any time upgrade the resources like RAM, storage or CPU to accommodate your increasing website traffic and load.
Once the droplet has been created (which hardly takes 55 seconds), you need to do some initial server setup. You can use Putty (Windows) or Terminal (Mac) to login to your server via SSH. You will be asked to authenticate using the root password.
ssh root@your_digitalocean_server_ip
The root user holds lots and most of the administrative privileges in a Linux environment. I would recommend not using it on a regular basis for security reasons. Instead, create an alternative user account with limited privileges. This can be done by the following command.
adduser newusername
Here you will be asked some basic questions (which you can skip) and a strong password. Once you have created the new user account, you now need to give some administrative privileges or called "superuser". That's by assigning the new user to the “sudo" group. By doing so, the new user account can run commands with administrative privileges by simply putting the word sudo before each command.
usermod -aG sudo newusername
Now you are ready to log out as root user and login back as the newly created user. (Note that, before you log out of the server as root user, you need to test if the newly created user account works. That can be done by opening a new putty/terminal window and logging in as the new user. Do not disconnect from root account until you have successfully logged in as the new user via SSH).
DigitalOcean Cloud FireWalls
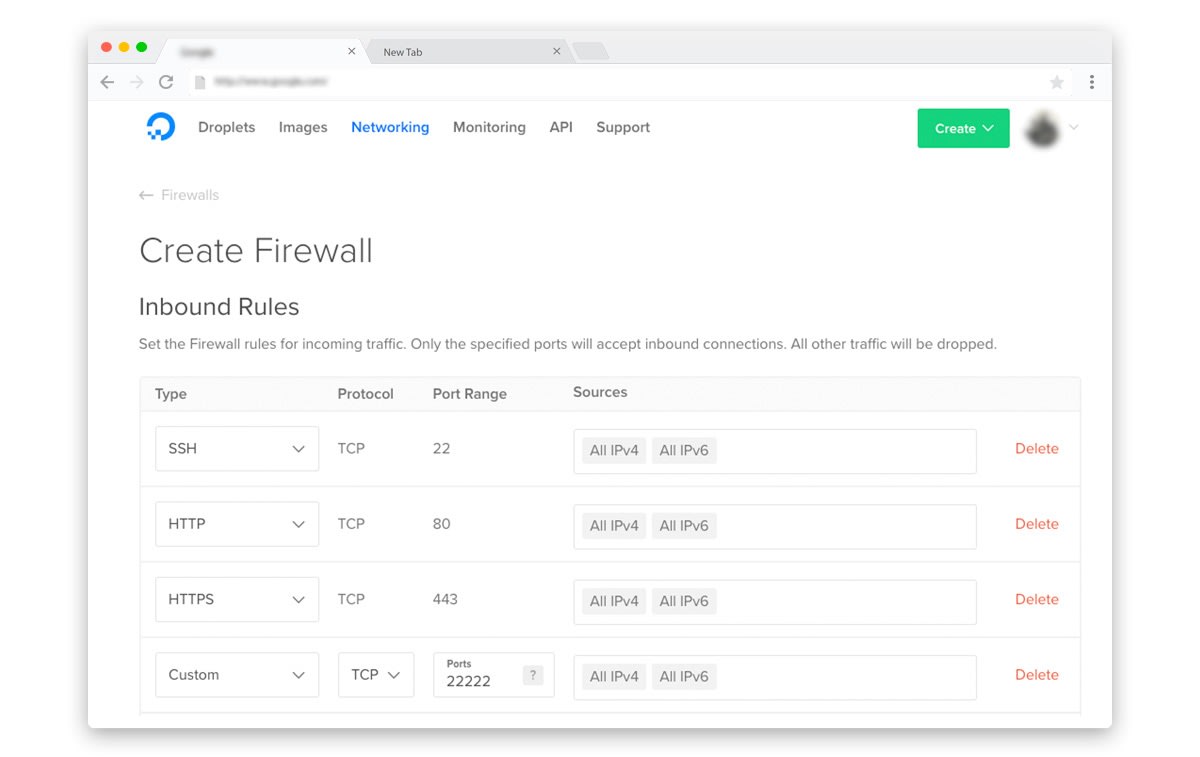
Next step is to set up a basic Firewall. Normally in Ubuntu, you have to configure the UFW firewall to allow or block certain connections. But with DigitalOcean you can create Cloud Firewalls which provide a network-based, stateful firewall service for all your Droplets. That's sort of visual representation to the command line UFW firewall.

You can configure the Cloud Firewalls in your DigitalOcean Control Panel under the 'Networking' section. Basically, you need to add SSH, HTTP, HTTPS and a custom port (22222) for the EasyEngine admin tools (like PHPMyAdmin).
Installing and Configuring Easyengine v3
So, you have set up your DigitalOcean droplet and made it secure with a basic firewall. Now you need is a web server that can run your WordPress website. Installing EasyEngine just needs a few quick commands.
apt-get update && apt-get upgrade -y
This will install any new updates for Ubuntu.
wget -qO ee rt.cx/ee && sudo bash ee
This single line command will install the full EasyEngine on your server. During the installation, it will ask for some basic details like name and email ID.
Create a WordPress with NGINX, PHP7, Redis Cache and SSL
Now it's time to build your super optimised WordPress website on the DigitalOcean server using EasyEngine. All it takes a single command with EasyEngine.
ee site create example.com --user=wordpressadmin --email=email@example.com --php7 --wpredis --letsencrypt
Here instead of 'example.com' use your domain name (don't forget to update your domain DNS to the new server IP). Instead of 'wordpressadmin' use a unique WordPress admin username, which is an important part of WordPress security. Also in the 'email@example.com' use your website's admin email address.
Once EasyEngine does its work, you will be shown the WordPress installation details which will also include the WordPress website admin password. Do copy the password and remember it as it will be needed to log in to your WordPress admin backend.
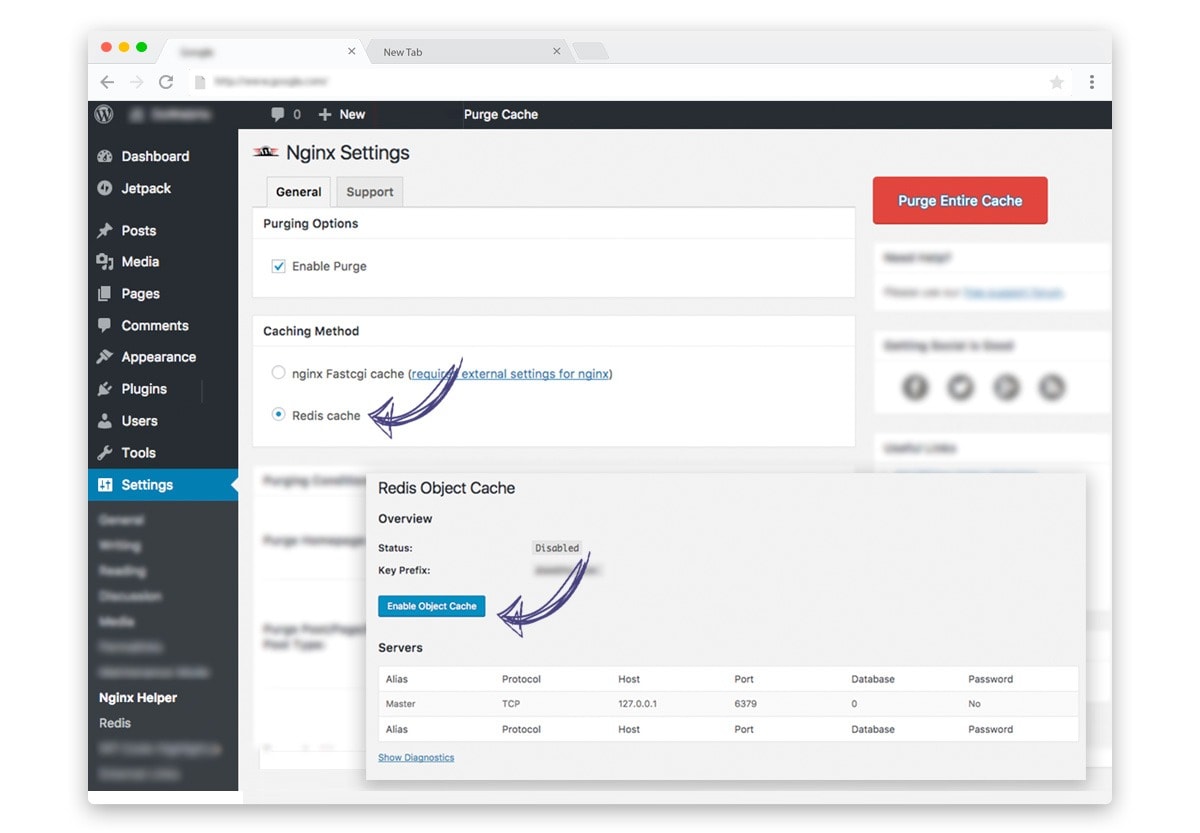
Next, log in to your newly installed WordPress website. Under settings there will be two WordPress plugin - Nginx Helper and Redis from EasyEngine already installed and activated. (If not activated you can easily activate from the Plugin's section). In the Redis Object Cache plugin, you need to enable the object cache. While in the Nginx Helper plugin you need to enable Purge and choose the caching method as "Redis cache". There are also other settings which you can toggle for further optimising your WordPress website cache.

That's it! You have successfully created a highly optimised WordPress website with NGINX, PHP7, Nginx's Redis Cache and fully secured with Let's Encrypt SSL certificate. Got any sort of doubts or stuck anywhere during the installation process, let me know I would be more than happy to help you out.